Tuesday, 27 September 2011

Raspberry vodka

This may seem a little out of season, but it works if you have a lot of later season raspberries, or do like I did and cheat, buy frozen berries from the supermarket.

Last year we tried this with fresh supermarket berries because we left it too late to go to the pick your own, it was nice, but not as fruity as I would have liked and rather expensive. Froxen berries are much cheaper and they seemed riper.

I started this a few weeks back as it will be bottled up for Christmas presents, but there is still time to make it before Christmas.

I got a little overenthusiastic with the quantities of berries and sugar because I like it sweet and fruity, you can, of course, adjust to suit your tastes.

You will need:
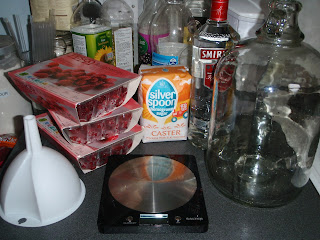
2l Vodka
1.5kg Raspberries, fresh or frozen
750g Sugar, most recipes seem to use granulated, but I had caster to hand and can't really see that it matters

Demijohn or large jar with a good closure, significantly larger than your quantity of vodka
A funnel if your demijohn/jar has a smallish opening

Ignore the random stuff that lives at the back of the worktop, that is not involved.


Weigh out the sugar, use the funnel to pour it into the demijohn, do this first when it is all nice and dry means the sugar does not stick to everything.

Add the berries to the demijohn. They are less squishy if you do it when they are frozen, but you get very cold fingers, whether you prefer squishy or cold is up to you, don't get frostbite!


Use the funnel to pour in the vodka. Close the top and give it a good swirl around to mix the sugar in.


Covering it will help to keep the colour. Give it a swirl a couple of times a week to start with, once all the sugar is mixed in you can just let it sit. Obviously keep an eye out for any signs of it going iffy.


After two to three months it can be strained through a jam bag and bottled up. It is meant to improve further with age, so last year's is even better than the fresh stuff, but I have not had any long enough to test that.

Other fruit can be substituted in, blackberries and sloes both use the same process.
Thursday, 22 September 2011

Beef Wellington

Tesco sell bags of vacuum packed steaks, and quite often they turn up in the reduced section of the chilled aisles. They are usually a pretty good bargain, who can argue with half price British fillet steak?! As a bonus, the fact they are well sealed in the vacuum pack means you can beat them with a rolling pin for extra tenderness without getting steak juice all over the kitchen.

Since they were bargainous I figured I would try my hand at beef wellington, it was unlikely to be completely inedible, but at least if it was I would not have ruined expensive steak (see how much faith I have in my cooking skills?). It turned out very tasty, so I am sharing it here, it is maybe not the official way, but I pieced it together from ones I have seen on TV, yes I could have looked the recipe up, but never mind.

Ingredients:
Fillet steak, either one bit per person for individual ones or a bit big enough to share
Farmhouse pate, it has mushrooms in there so saves time/faffing
Puff pastry
Egg, beaten in a jug for sealing/egg wash
Anything you would like to serve with your beef wellington, I added new potatoes, peas and sweetcorn

Set the oven warming up to about 200 degrees C.

Put the steak into a hot frying pan pan to seal it on all sides, make it nicely brown then take it off the heat, leave it to sit while you do the next bit.

Roll out the pastry, you want to make a rectangle that is quite a bit more than twice the size of your chunk of steak.

Spread some pate on the pastry sheet, just off centre, covering an area the same size as the steak, then sit your nicely browned steak on top, it will look a bit like this:


Spread beaten egg around the edges of the steak


Fold the other half of the pastry over the top and fold all the edges in, give then a good squeeze to seal them (for some reason this photo has rotated 180 degrees, logically the folds would be at the bottom). Optionally egg wash the top of the parcel if you have a lot of egg leftover.


Put the parcel of tastiness onto a non stick sheet on a baking tray and into the oven until the pastry is a lovely golden brown, it will probably be fifteen to twenty minutes.

Serve up with your choice of tasty sides, enjoy eating.


As you can see I accidentally made HUGE parcels. When the steaks came out of the bag they looked a bit small and feeble so I did one each. This is deceptive as we could have comfortably shared one parcel between two people.

Monday, 12 September 2011

Minimal muscles required bread


I have heard a lot of talk about the book "Artisan bread in five minutes a day", for the most part it has been very good talk, so I kind of fancied giving it a go, but did not want to buy the book without knowing if it was good first. Fortunately it was a case of internet to the rescue, I was directed to a link giving the basic recipe and some variations (it is a legal and legit link, they interview the author).

Decent homemade bread eludes me, while I can accept it will never be exactly like the stuff you buy (either sliced or bakery) I never seem to get it right, making something that is edible but not quite what I am after. I also don't have space for a bread maker, and am not keen on the paddle hole they leave anyway.

The recipe is easy to follow, you make up a wet dough and keep it in the fridge over night, or longer. When you want the bread you take some out, shape it and cook it, and tada, fresh bread with minimal daily effort. The daily bit probably only takes five minutes of effort, but you do need to mix the dough in the first place, which takes longer, and there is waiting and cooking time so it is not like out of the fridge and five minutes later you are eating bread, but that is ok, I mean you would have to be expeting a magic trick if that is what you are after. 

I halved the quantity, giving enough for two baking sessions. I also didn't mess about with a pizza stone, I don't have one and the sticky dough would make a horrible mess anyway I think (plus I suspect I would burn myself in the process). I just put it on a baking sheet and it seemed quite happy. I rubbed it with butter when it came out of the oven, I was told this makes the crust softer and explains why it is very shiny in this photo:


It looks good (even if I say so myself), and was less effort than traditional bread although I did have to plan ahead and mix the dough the night before, plus find fridge space for it.


It is still not quite right though. I can't deicde if I am wanting the impossible and what I class as not quite right is the same thing everyone else raves about as delicious home made bread or if I am still getting something wrong.

Since I was not blown away with it I used the rest of the dough to make a pizza. The dough is pretty sticky, so spreading it out was a bit of a pain. I baked it until it was crispy before adding the toppings.


The pizza was much more of a success than the loaf, I would maybe make pizza like this again, but I think I might still be on the hunt for the perfect loaf. Or should I give up and accept that a Tiger loaf from Tesco is bready perfection?


Wednesday, 7 September 2011

Great Gammon

Gammon steak with chips and peas plus trimmings is delicious. But the ones you buy tend to go leathery and nasty when they are cooked, so today I share with you the secret of great Gammon (from my Mum).

Go to your local butcher and ask nicely if they will cut you a gammon steak twice the normal thickness. This will do two people, which makes sence if you think about it since it is twice the volume of meat as a standard steak, unless you are really hungry. If the butcher says no and looks at you oddly try a different one (I got these through my Mum from a butcher 200 miles away, but you should be able to find one closer).

It should be about this thick:


Cut the round steak into two pieces and trim off the rind (unless you want it). Grill, turning several times until cooked (these took about 35 minutes, remember they are thicker).


Serve with chips and trimmings and enjoy. I was too busy eating mine to take a photo but it was juicy and delicious.