Saturday, 9 June 2012

The best bread

I have made a few batches of  bread, but it tends to come out chewy. It is ok for spreading with butter and pate or cheese, but not much use for sandwiches.

I finally got round to trying this recipe (seriously, go there and check it out). It makes, without doubt, the best homemade bread I have ever done. In fact, I have made some most weekends since I tried it. It even got the thumbs up from the OH who is usually not bothered by homemade bread.

The rolls are soft and perfect for burgers or filling with tuna, cheese, ham or whatever else you fancy. 

They do come out looking and feeling like they will be crispy but they soften as they cool.


I have made a couple of variations too, the top right in the picture have 50g of sugar and 100g of sultanas added to the mix. Next time I would make the dough with the sugar and add the sultanas in at the end, they got rather squished.

I have done some wholemeal ones too. Nothing complicated here, just switch the flour for wholemeal.


Friday, 18 May 2012

Melton cheese festival

Last weekend was the Melton Artisan Cheese festival. The £1 entry was definitely worth it, about forty vendors, offering tasters of a huge range of cheeses.

After a round of the venue we each picked our favourites, I opted for Coquetdale, a great chedder.


We also picked up some Stichelton (I think that is spelt right), a blue cheese that passed the taste test of an ex stilton maker.

There were a couple of non cheese vendors, some chocolate, UK sourced wine, pork pies, cake and a couple of ciders. This box of cider came home with us. I preferred the sparkling but the OH liked the still.


There was an excellent fruit cake made by Dickinson and Morris (the pork pie people). It is called Melton Hunt cake and is amazing. Unfortunately I can't find a recipe anywhere and didn't pick any up. I will have to find a recipe that looks similar and tweak it.


Friday, 11 May 2012

Candle making

Ages ago we bought the biggest candle you have ever seen from Ikea. I kid you not, this thing was more than a foot across and had seven wicks. Once it had burnt down (and been slightly melted at the side by leaving it too close to the fire) there was a lot of wax left. It seemed like a waste to just bin it.

The giant wax chunk was chopped into chunks. This stuff is suprisingly hard. The process involved a saw and a blow torch, no pictures of this as I am certain it is not a recommended method!

Supplies for remaking the candles came from ebay. I picked up wick cord and a pack of sustainers rather than the premade ones. It was cheaper and you can have the wick any length. You just use pliers to trap the end of the cord in the sustainer.


Plastic candle moulds were a good price so I picked up some of those, I used a couple of old jam jars too. A light spray with olive oil stopped the candles sticking. On reflection wick pins sound like a good idea, getting the wicks to stay straight and centered without them was a bit fiddly. If I make another order I would pick some up.


I weighed the wax chunk and put it to melt.

The wax took FOREVER to melt (ok, obviously not forever but a long time). The easy melt wax beads you can buy seem like a much better idea at this point, but the idea was to use up the leftover wax. It is doable it just takes time.

Once it was melted I added beeswax pellets (ten percent of the weight of the other wax).


Using a jug to melt the wax makes pouring into moulds fairly easy. Some of the wax had a little vanilla fragrance oil stirred in before pouring to make scented candles.


Once cooled the candles were taken out of the moulds and the wicks trimmed.


I did find that as they cooled the candles sunk quite a bit near the wick. Not sure what to do about this. Not a problem for ones being used but they look a little odd so not ideal for gifts. Letting the wax cool a little before pouring might help.

Saturday, 24 March 2012

Spring gardening

Last week the seeds went in and onto the windowsill. Two of each thing I am hoping to grow- tomatoes, melons, squash, cucumber.


No signs of growth yet, I think the windowsill may not be warm enough but hopefully they will be ok. Some of the seeds were quite old so that might be the problem.

This weekend it was the turn of outside. Dead plants were removed, raspberries cut back, pots tidied up and plants moved to new locations. It looks much nicer out there now.

One of the mini fruit trees has blossoms and a daffodil and tulip are both in flower at the bottom of the garden, lots of buds and new growth about too. Spring is definitely underway.

Tuesday, 21 February 2012

Marmalade

I keep making things, taking photos and then never getting around to blogging them. I am going to try and work through the backlog in the next few weeks and then hopefully the excitement of spring will give new things to blog about.

Starting with my most recent experiment, marmalade.

I had never made marmalade before, but figured it would be a good way to get small jars of shreddless marmalade. I used the Everyday marmalade recipe in Jams and Chutneys by Thane Price as a starting point.


The seville oranges were a bargain at ten for £1 on the market. The recipe uses seven, but I added the juice from the extra three anyway as I didn't want to waste them. A lemon and a couple of sweet oranges went in too.

The fruit was boiled whole for about an hour, until the skin is very soft. The boiling water takes on an orangey colour and smell. Some of the fruit popped open, but only juice seemed to have escaped.


The fruit was taken out and allowed to cool, then the insides scooped out and the peel finely sliced. I only sliced the skins of three seville oranges as some of the marmalade was destined to be shreddless.


I took a detour from the recipe here. The shredded peel was kept to the side and all the rest of the fruit chopped up and put in a jam bag. The bag was hung into the pan of water and simmered for a while until there was about 2 1/2 pints of liquid.

The bag of mushy oranges was taken out and the peel and flesh removed. The bag went back in the pan with just the pips in. Internet knowledge tells me they contain most of the pectin so I figured having them in a little longer would help the set.


Sugar went in next, a mixture of caster, a little ja, sugar and some golden brown suger. A radom combination, but that was what I had in the cupboard. The mix was stirred until the sugar had dissolved, then the marmalade was cooked at rolling boil, testing every 5-10 minutes until a set was reached. It took about 40 minutes, much longer than the book suggests.


Once it had reached setting point the heat was turned off and the bubbly scum on the top skimmed off.

About half the marmalade was put into jars, the rest was left to cool for a further 5 minutes, then had the sliced peel stirred in. The cooling stops the peel floating to the top. Then into jars.


It took a few days to summon up the courage to actually taste it. I was worried it would be far too bitter and totally inedible.

I am pleased to report it tastes right. The set is a bit odd though, not very jelly like, more thick and sticky, still goes well on toast.

Friday, 25 November 2011

Sloe vodka

This should have been posted a few weeks ago. We went on a sloe picking mission to get supplies for sloe gin and vodka.

Something odd was going on with the trees, some had loads of sloes, others had absolutely none, not like they had been already picked but literally not a single sloe to be seen.

This meant we got fewer sloes than in previous years, we came home with about 1lb 6oz of sloes.


The sloes were rinsed and several holes pricked in each one using a blackthorn thorn. This is a long process and best done with something interesting to listen to.

The sloes were put into a jar, then sugar and vodka added (1lb 2oz sloes, 9oz sugar and 1l vodka). It has all been left and will be strained just before Christmas with occasional shaking to make sure all the sugar dissolves. We also made a small batch of sloe gin to give as a Christmas present, using 4oz of sloes, 300ml of gin and 2oz sugar.

Tuesday, 8 November 2011

Pumpkin cookies

As promised I used the pumpkin scrapings in baking, and returned to show you some pictures.

Most recipes online start with pumpkin puree, so I pinged the bowlful in the microwave for a few minutes then poked at it with the hand blender. I ended up with a lot of puree.

I googled recipes, I thought chocolate would be the best option so went for cookies, adding cocoa to the recipe to make them chocolate chocolate chunk cookies. 


Honestly I am not blown away by them. The mix was very runny, it looked more like cake mix and I debated sticking it in cupcake cases but thought it might not cook through. The biscuits have a somewhat rubbery texture. Not inedible, but not "oh my gosh these are amazing".

They also used very little pumpkin puree, so I still have a huge bowl of it. I am not sure if it is worth baking anything else. I may freeze a few batches for adding to curry sauce.

Monday, 31 October 2011

Happy Halloween

I apologise for being a rubbish blogger of late, I keep thinking "I'll put that up" than never getting round to it. I will try to do better.

In the meantime, here's a seasonal photo for you


I am going to try my hand at pumpkin pie with the scoopings, so I will report back soon.

Tuesday, 27 September 2011

Raspberry vodka

This may seem a little out of season, but it works if you have a lot of later season raspberries, or do like I did and cheat, buy frozen berries from the supermarket.

Last year we tried this with fresh supermarket berries because we left it too late to go to the pick your own, it was nice, but not as fruity as I would have liked and rather expensive. Froxen berries are much cheaper and they seemed riper.

I started this a few weeks back as it will be bottled up for Christmas presents, but there is still time to make it before Christmas.

I got a little overenthusiastic with the quantities of berries and sugar because I like it sweet and fruity, you can, of course, adjust to suit your tastes.

You will need:
2l Vodka
1.5kg Raspberries, fresh or frozen
750g Sugar, most recipes seem to use granulated, but I had caster to hand and can't really see that it matters

Demijohn or large jar with a good closure, significantly larger than your quantity of vodka
A funnel if your demijohn/jar has a smallish opening

Ignore the random stuff that lives at the back of the worktop, that is not involved.


Weigh out the sugar, use the funnel to pour it into the demijohn, do this first when it is all nice and dry means the sugar does not stick to everything.

Add the berries to the demijohn. They are less squishy if you do it when they are frozen, but you get very cold fingers, whether you prefer squishy or cold is up to you, don't get frostbite!


Use the funnel to pour in the vodka. Close the top and give it a good swirl around to mix the sugar in.


Covering it will help to keep the colour. Give it a swirl a couple of times a week to start with, once all the sugar is mixed in you can just let it sit. Obviously keep an eye out for any signs of it going iffy.


After two to three months it can be strained through a jam bag and bottled up. It is meant to improve further with age, so last year's is even better than the fresh stuff, but I have not had any long enough to test that.

Other fruit can be substituted in, blackberries and sloes both use the same process.

Thursday, 22 September 2011

Beef Wellington

Tesco sell bags of vacuum packed steaks, and quite often they turn up in the reduced section of the chilled aisles. They are usually a pretty good bargain, who can argue with half price British fillet steak?! As a bonus, the fact they are well sealed in the vacuum pack means you can beat them with a rolling pin for extra tenderness without getting steak juice all over the kitchen.

Since they were bargainous I figured I would try my hand at beef wellington, it was unlikely to be completely inedible, but at least if it was I would not have ruined expensive steak (see how much faith I have in my cooking skills?). It turned out very tasty, so I am sharing it here, it is maybe not the official way, but I pieced it together from ones I have seen on TV, yes I could have looked the recipe up, but never mind.

Ingredients:
Fillet steak, either one bit per person for individual ones or a bit big enough to share
Farmhouse pate, it has mushrooms in there so saves time/faffing
Puff pastry
Egg, beaten in a jug for sealing/egg wash
Anything you would like to serve with your beef wellington, I added new potatoes, peas and sweetcorn

Set the oven warming up to about 200 degrees C.

Put the steak into a hot frying pan pan to seal it on all sides, make it nicely brown then take it off the heat, leave it to sit while you do the next bit.

Roll out the pastry, you want to make a rectangle that is quite a bit more than twice the size of your chunk of steak.

Spread some pate on the pastry sheet, just off centre, covering an area the same size as the steak, then sit your nicely browned steak on top, it will look a bit like this:


Spread beaten egg around the edges of the steak


Fold the other half of the pastry over the top and fold all the edges in, give then a good squeeze to seal them (for some reason this photo has rotated 180 degrees, logically the folds would be at the bottom). Optionally egg wash the top of the parcel if you have a lot of egg leftover.


Put the parcel of tastiness onto a non stick sheet on a baking tray and into the oven until the pastry is a lovely golden brown, it will probably be fifteen to twenty minutes.

Serve up with your choice of tasty sides, enjoy eating.


As you can see I accidentally made HUGE parcels. When the steaks came out of the bag they looked a bit small and feeble so I did one each. This is deceptive as we could have comfortably shared one parcel between two people.

Monday, 12 September 2011

Minimal muscles required bread


I have heard a lot of talk about the book "Artisan bread in five minutes a day", for the most part it has been very good talk, so I kind of fancied giving it a go, but did not want to buy the book without knowing if it was good first. Fortunately it was a case of internet to the rescue, I was directed to a link giving the basic recipe and some variations (it is a legal and legit link, they interview the author).

Decent homemade bread eludes me, while I can accept it will never be exactly like the stuff you buy (either sliced or bakery) I never seem to get it right, making something that is edible but not quite what I am after. I also don't have space for a bread maker, and am not keen on the paddle hole they leave anyway.

The recipe is easy to follow, you make up a wet dough and keep it in the fridge over night, or longer. When you want the bread you take some out, shape it and cook it, and tada, fresh bread with minimal daily effort. The daily bit probably only takes five minutes of effort, but you do need to mix the dough in the first place, which takes longer, and there is waiting and cooking time so it is not like out of the fridge and five minutes later you are eating bread, but that is ok, I mean you would have to be expeting a magic trick if that is what you are after. 

I halved the quantity, giving enough for two baking sessions. I also didn't mess about with a pizza stone, I don't have one and the sticky dough would make a horrible mess anyway I think (plus I suspect I would burn myself in the process). I just put it on a baking sheet and it seemed quite happy. I rubbed it with butter when it came out of the oven, I was told this makes the crust softer and explains why it is very shiny in this photo:


It looks good (even if I say so myself), and was less effort than traditional bread although I did have to plan ahead and mix the dough the night before, plus find fridge space for it.


It is still not quite right though. I can't deicde if I am wanting the impossible and what I class as not quite right is the same thing everyone else raves about as delicious home made bread or if I am still getting something wrong.

Since I was not blown away with it I used the rest of the dough to make a pizza. The dough is pretty sticky, so spreading it out was a bit of a pain. I baked it until it was crispy before adding the toppings.


The pizza was much more of a success than the loaf, I would maybe make pizza like this again, but I think I might still be on the hunt for the perfect loaf. Or should I give up and accept that a Tiger loaf from Tesco is bready perfection?


Wednesday, 7 September 2011

Great Gammon

Gammon steak with chips and peas plus trimmings is delicious. But the ones you buy tend to go leathery and nasty when they are cooked, so today I share with you the secret of great Gammon (from my Mum).

Go to your local butcher and ask nicely if they will cut you a gammon steak twice the normal thickness. This will do two people, which makes sence if you think about it since it is twice the volume of meat as a standard steak, unless you are really hungry. If the butcher says no and looks at you oddly try a different one (I got these through my Mum from a butcher 200 miles away, but you should be able to find one closer).

It should be about this thick:


Cut the round steak into two pieces and trim off the rind (unless you want it). Grill, turning several times until cooked (these took about 35 minutes, remember they are thicker).


Serve with chips and trimmings and enjoy. I was too busy eating mine to take a photo but it was juicy and delicious.

Tuesday, 30 August 2011

Blackberry jelly

This weekend we found an enormous blackberry patch, completely by chance. About 500g came home in a bag, just a small picking but we will try to go back for more soon.


Since wild blackberries tend to be very pippy jelly seemed to be a better idea than jam. 400g went into a pan with a little water to be boiled and mashed, then left to drip through a jelly bag overnight. I had a flash of inspiration and realised I could hang a jelly bag from the extractor fan knob. Oh, and the missing 100g of berries were eaten :)


The juice in the bowl measured just over half a pint, so it was mixed with the juice of a lemon and 8oz jam sugar (the stuff with pectin already added in) and boiled vigorously for 4 minutes. A small test on a chilled plate showed it had reached setting point so it was poured into jars.

400g of berries gave about two and a third small jars of jelly.


The part jar has already been eaten!


Monday, 22 August 2011

Ibstock country show

Yesterday (Sun 21st August) was the Ibstock country show. I found the details while I was looking for craft shows and decided it was worth a look, especially as it was such a gorgeous sunny day.

Although it was a little smaller than I expected from the website details it was very enjoyable. We arrived just after it started, I think it would have been better to get there at about 12 as we would have caught more of the arena entertainment. Nevermind, we walked around the stalls and through the craft tent, I very uncharacteristically resisted buying both yarn and spinning fibre. Watched some pony club games in the arena (those kids are crazy!) and a remote control helicopter demo and had an ice cream.

There were a few animal stands too, which always pleases me, I took pictures of those.

Shires getting ready for a demo in the arena later on.


 A Lincoln long wool sheep


Very large French lop bunny


Assorted poultry


Pigs (mmmm, bacon!)


Two steam engines, an organ arrived a little later too.

And a display of vintage cars of various sorts and ages, I particularly liked this one, it is very "Bertie Wooster"


There were a lot of other things happening, dog shows, bands, displays etc but we headed home after we had done a few laps of the field. I would go again, but like I said at the top of the post would probably head over a little later to catch more of the action.

Wednesday, 17 August 2011

Thursday, 11 August 2011

A garden update

I have been a ittle quiet lately, I will try to do better. I thought it was about time for a garden update, some of my plants have survived my repeatedly forgetting to water them, some are even thriving!

The mini potted peach tree has two peaches under way. I was not expecting any this year as it spent all its blossoming season in a garden centre, but some little critters must have made it in there to pollinate anyway.


Possibly the best sunflower I have ever grown, although the head is a bit small, might just be the variety.


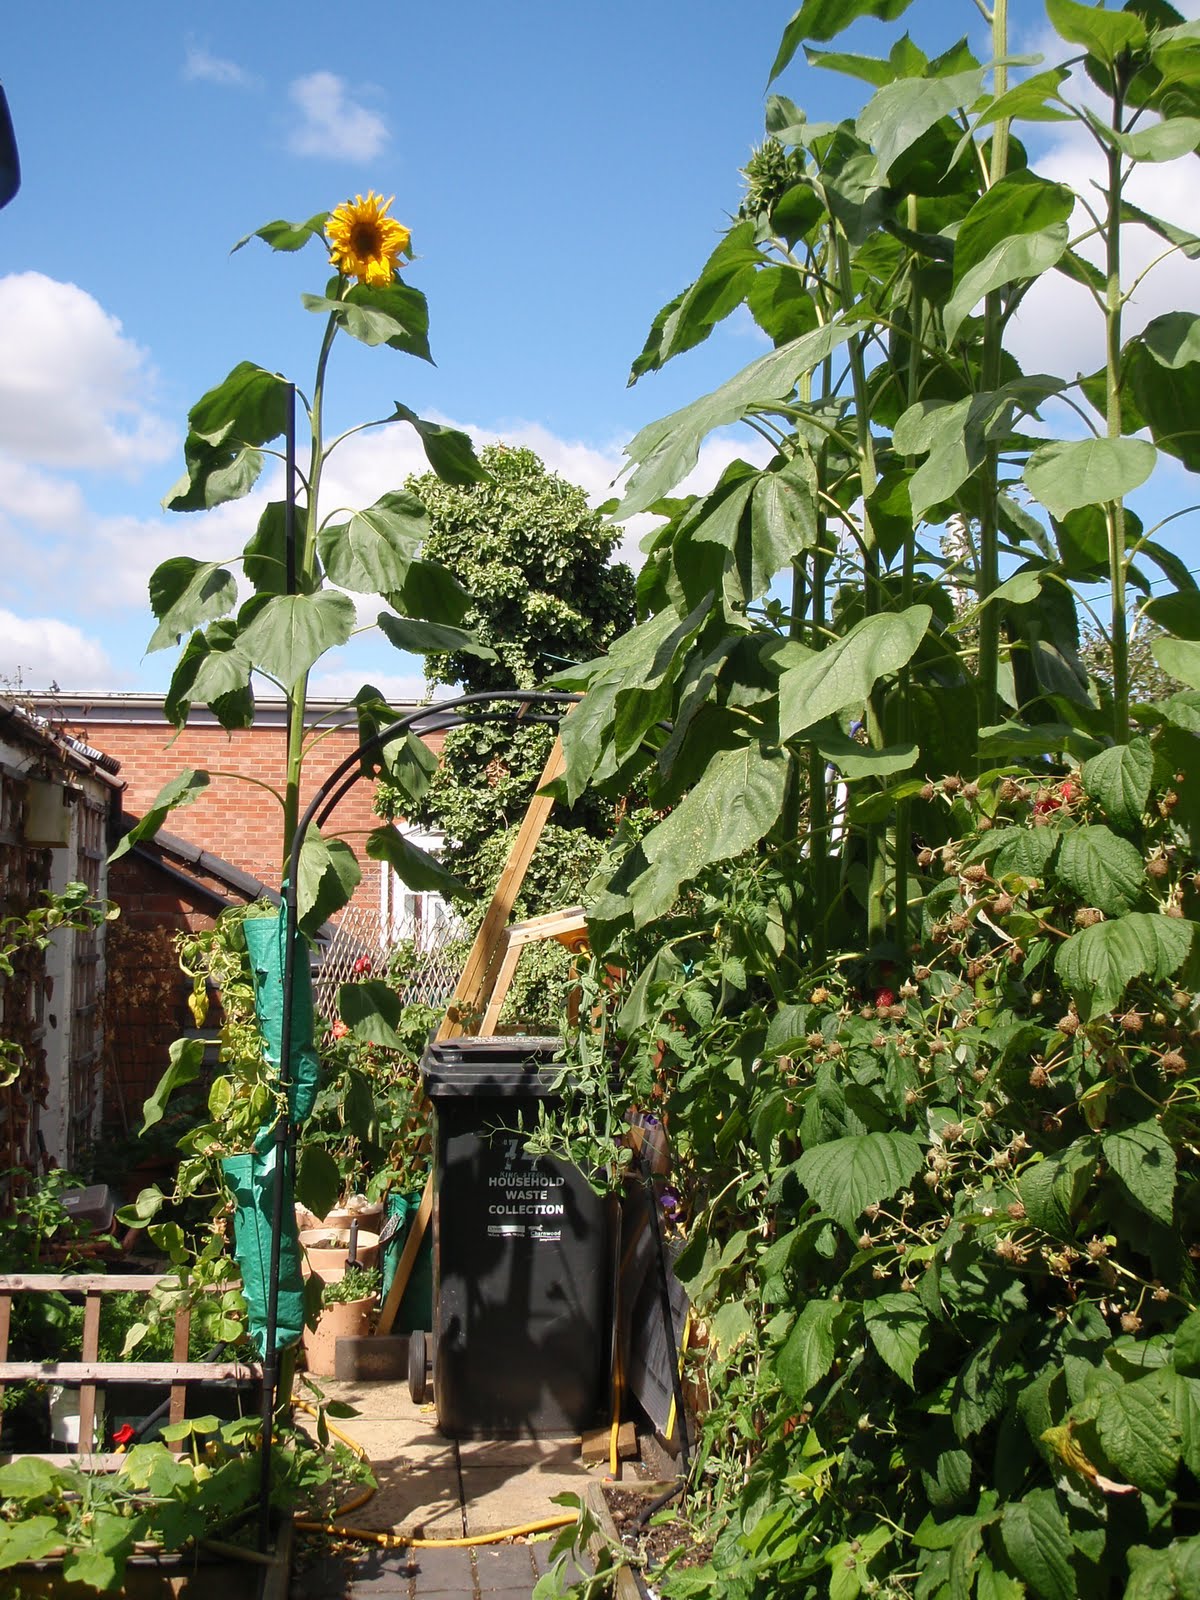
A full length shot of the sunflower and the side bed. The sunflower is about 2.8m tall. Along the side there are more sunflowers and raspberry bushes intent on taking over the world. Unfortunately the rest of the plants in here have not done so well.
You also get a lovely view of the bin. It has been moved down the garden to allow for the new recycling wheelie bin that is meant to be arriving soon, it will be an improvement on the purple plastic bags, but there is not really space for it in my garden. Some pots had to be moved to house the general bin, next year I will grow more things over the arch to hide it.


Raspberries, yum! These are an autumn variety (should be Polka, but seems overly thorned). There are lots of them this year and just a handful are coming ripe each day. They don't usually make it into the house before being eaten.


I had planned to have loads of flowers this year, but was not overly successful. These gorgeous dark blue/purple sweet peas made it though.


As did a few gerberas bought as plug plants, a yellow


and a pink.